While conventional photographs record visible light from a scene as you might see it with your eyes, infrared (IR) photographs record invisible infrared light, producing interesting and unexpected results. Cameras adapted to capture infrared light, sometimes referred to as IR cameras, may be expensive. However, if you have a discarded camera that you are willing to open up and tinker with, you may be able to make an IR camera yourself. Following are some instructions for making an inexpensive digital toy IR camera (toyIR). You can seem some images I captured with this toyIR camera on my flickr site, here. And, here are images I've taken with other infrared cameras.
How to Make a Digital Toy Infrared Camera (ToyIR)
by Zach Stern (zachstern@yahoo.com)
Updated January 2012
by Zach Stern (zachstern@yahoo.com)
Updated January 2012
Infrared Photography in General
Digital light sensors are sensitive to both visible light and infrared light. To avoid saturation of the sensors by infrared light, which would produce unnatural looking pictures, conventional digital cameras include an infrared blocking filter or mirror (sometimes called a “hot-mirror”) in the optical path to reduce the amount of infrared light that gets to the sensor. Because some infrared light still gets through, it is possible to take an infrared photo with a conventional camera using a long exposure and an infrared pass filter (i.e., a filter that blocks almost all light except for infrared light) to prevent visible light from saturating the sensors and to allow the sensor to gather every bit of the small amount of infrared light that gets through the infrared blocking filter. Unfortunately, such long exposures limit the situations in which infrared photos may be captured with a conventional camera. If the infrared blocking filter is removed, high speed digital infrared photos become possible, allowing greater flexibility, although some infrared pass filtering is still required to prevent visible light from saturating and dominating the image.
Custom IR solutions involve modifying a high end camera to replace the IR blocking filter with a custom IR pass filter. Such custom solutions require precision camera modification and use expensive IR pass filters, such as the Hoya R72 or R80, and the custom solutions are capable of producing very nice images. On the other hand, you can obtain similar results using much less expensive plastic gel lighting filters and if you're willing to take the risk of modifying your camera on your own.
Do-it-yourself ToyIR Instructions
Parts you need:
If you are a responsible adult willing to take complete responsibility for any camera damage that may result from these instructions - please read on!!
General do-it-yourself procedure (two steps - so easy!):
Parts you need:
- An inexpensive digital camera, such as the Aiptek Pocket DVII (available in the closeout bin at my local Ritz Camera store for $30).
Don't attempt this project on a camera that you can't afford to destroy. I initially tried this project with my much loved Sony F717 (which inherently has a nice IR capability even without modification) and unfortunately I destroyed a fragile internal flexible connector in the process, converting the camera into a door stop. If you decide not to try it yourself, I recommend the professional conversion services of MaxMax.com. Here are some pictures I've taken with my MaxMax.com converted cameras: XNiteCanonG9, and XNiteLumixLX3.
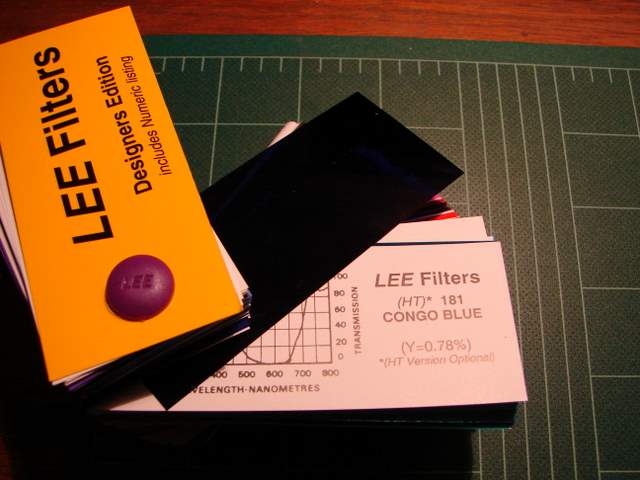
- A sheet of “Congo Blue” filter gel (Lee #181 or Rosco #382) (available at local suppliers or B&H for about $6 per 24” sheet. If you're REALLY cheap, you can cut the gels out of a free sample book – see below).
If you are a responsible adult willing to take complete responsibility for any camera damage that may result from these instructions - please read on!!
General do-it-yourself procedure (two steps - so easy!):
- Remove the infrared blocking filter from your digital camera; and
- Insert 6 layers of the Congo Blue filter gel in the optical path of the camera to pass only infrared light (and some blue light).
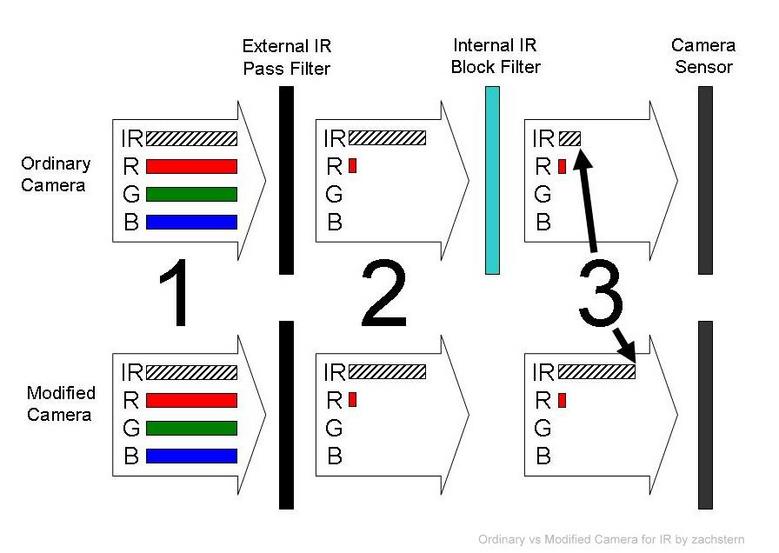
Ordinary vs. Modified Camera for IR
1 – polychromatic light from subject
2 – external IR pass filter blocks most visible light and passes most IR light
3 – ordinary camera: internal IR filter blocks some IR light from reaching camera sensor, so longer exposure required; modified camera: no internal IR block filter, so shorter exposure possible
Put everything back together and shoot away!! Please contact me here if you have good results, I'd love to hear about your version of the toyIR camera! Contact me here if you have bad results ;) Either way, enjoy your toyIR!
Detailed instructions to modify the Aiptek Pocket DVII (but, adaptable to other cameras, too):
Remove all the external screws from the camera case.
Remove all the external screws from the camera case.
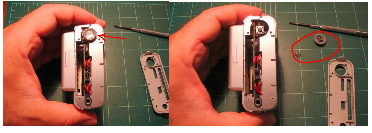
Carefully remove the back cover having the hole for the video button. Be careful not to lose the spring which sits behind the button.
Pull apart the two halves of the camera. You may have to wiggle the cover because the right half has a lip on top, near the shutter release, that extends over the image sensor. You may also have to pull on the front cover (through which the lens protrudes) or bend the edges of the front cover to help separate the two halves of the camera case.
WARNING: you cannot completely separate the two halves because they are connected by the battery leads (shown here in red, because I had to solder on new wires after I broke the original black and white wires).
Remove the main printed circuit board (PCB) mounting screws (circled in picture).
WARNING: you cannot completely separate the two halves because they are connected by the battery leads (shown here in red, because I had to solder on new wires after I broke the original black and white wires).
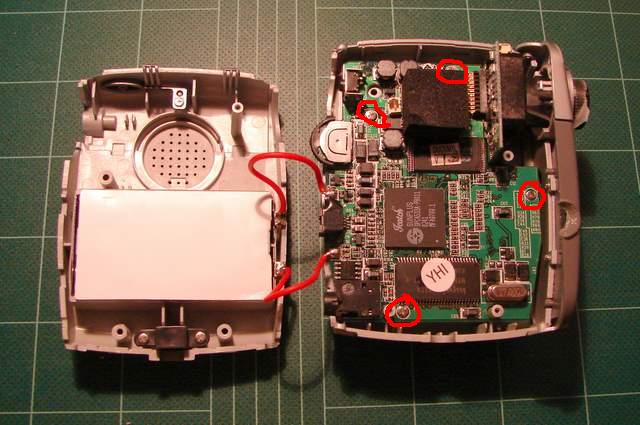
Remove the main printed circuit board (PCB) mounting screws (circled in picture).
Unscrew and completely remove the lens from the camera. Raise the main PCB slightly out of the plastic case, but do not try to remove it completely as it is connected to the LCD display in the plastic case by a ribbon cable that is tricky to reattach if it gets separated.
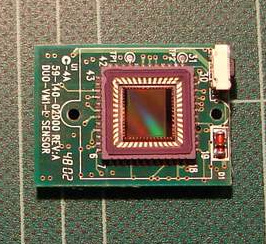
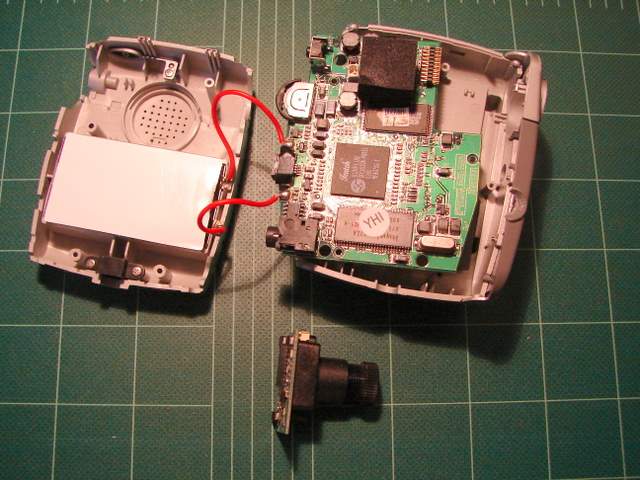
Unplug the sensor PCB from the main PCB (just pull it off the perpendicular connector pins, pulling in the direction of the lens). The sensor PCB is shown in the picture already having been removed from the main PCB.
Unplug the sensor PCB from the main PCB (just pull it off the perpendicular connector pins, pulling in the direction of the lens). The sensor PCB is shown in the picture already having been removed from the main PCB.
You can certainly experiment here with other numbers of layers and different filter gels. Bill Beaty also suggests adding a single layer of “Primary Red” filter gel (Lee #106 or Rosco #27) to the six layers of Congo Blue to reduce the amount of visible blue light that gets through. I've tried it both ways, but haven't decided if I prefer one way or the other yet (please let me know about your results). My local photography lighting store offered me several free sample books of Lee and Rosco filter gels when I bought the 24” sheet. You could probably find enough gel material in such a sample book to meet your needs, but why not support your local shop by making a purchase?
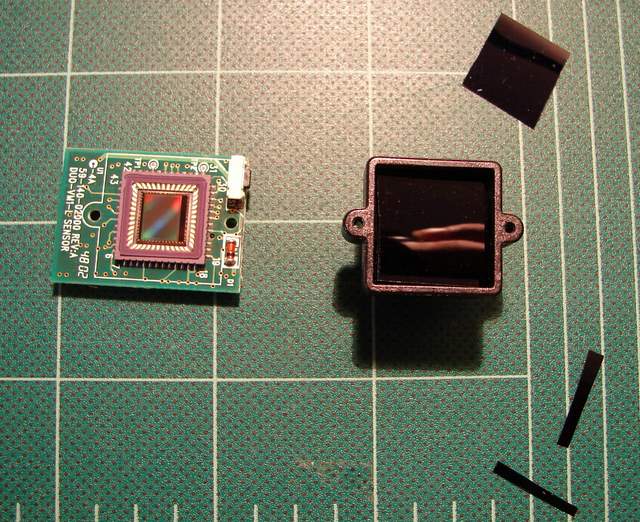
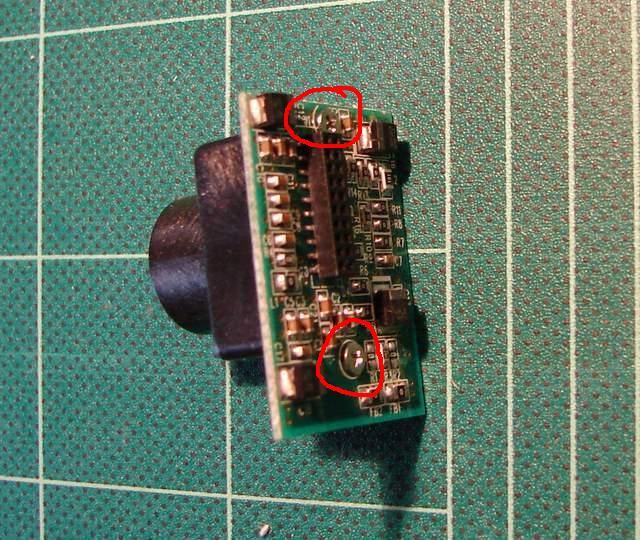
Remove the filter assembly mounting screws on the back of the sensor PCB (circled in the picture), and remove the filter assembly from the sensor PCB.
CAUTION: try not to get finger prints on the clear cover over the CCD sensor.
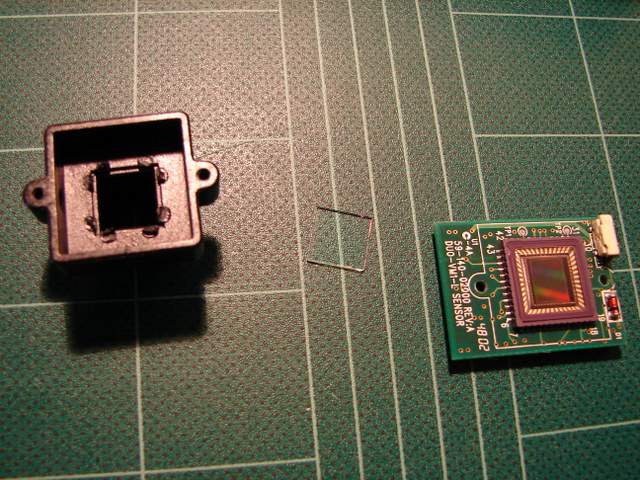
Permanently remove the IR filter from the IR filter assembly by breaking off the small plastic melt tabs holding the filter in place and prying out the small square bluish glass filter. WARNING: once you remove the IR filter, you will no longer be able to take conventional photos with this camera.
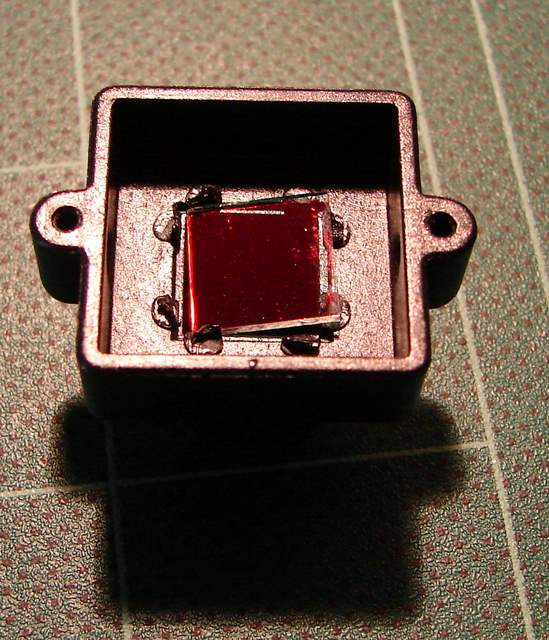
Here are the filter assembly (after filter has been removed; left), removed IR filter (center) and sensor assembly with CCD sensor (right).
Cut 6 small squares of “Congo Blue” each sized to fit within the large opening of the filter assembly, and just drop them in there. The gels are very soft, so be careful not to get fingerprints on them (cotton swabs and lens tissue will both scratch the gels). Just cut out the most pristine little squares that you can find on the 24” sheet. Use tweezers to handle the squares.